If you want to share your internet connection via WLAN (Wireless LAN) there are various way to do so. If your OS is Windows 7/Vista then it is very easy to share your connection [Create Wireless Home Network Without Router in Windows 7/Vista]. But what about the Windows XP? Personally, I used a third party software to share my internet connection with my room mates when using Windows XP (Professional). I did not like to use any third party software for this purpose but there was no option left while I was failed to share my connection without any software.
Why you should not use any third party software
1. The third party applications are more complex and use a large amount of memory. Obviously, this slow downs your machine. Where the only purpose is to share the internet connection then why would you use the complex applications?
2. When you use any third party tool there may be some issues with the security and privacy.
How to share the internet connection via Wireless LAN (WLAN)
Sharing internet connection in Windows XP via Wireless LAN is easy and simple process. Follow the instructions step by step.
1. Go to Control Panel > Network and Internet Connections > Network Connections.
2. Right click on the connection which is used to access the internet in your machine. Generally, it is the Local Area Connection. Right click on it and select Properties.

3. In the Local Area Connection Properties window, click on the “Advanced” tab. Now check in the box indicating “Allow other network user to connect through this computer’s Internet connection” and click OK.

4. Repeat the step 1 and right click on the “Wireless Network Connection” then choose“Properties”.
5. In the Wireless Network Connection Properties window select the “Wireless Networks”tab.
6. Check the box “Use Windows to configure my wireless network settings and then click on “Add…”.

7. Another window will pop up. Give a Network name (SSID) > Keep the check boxes checked or unchecked as highlighted in the picture below > Select the Network Authentication as“Open” and the Data encryption as “WEP” > type the Network key (Should be 5 or 13 Alphanumeric character) > Click on OK.

8. Now select connection and click on “Advanced”.

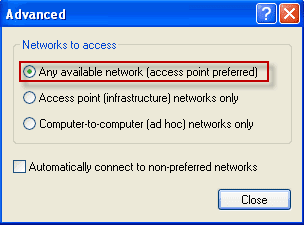
9. In the pop up window click on the button “Any available network (access point preferred)”then click on close and the OK.
Your network has been created successfully. Now you have to connect to that network.
1. Go to Control Panel > Network and Internet Connections > Network Connections.
2. Right click on the “Wireless Network Connection” then choose “View Available Wireless Networks”.

3. Select the network from the list and click on “Connect” > give the security key > Click“Connect”.
Now if any body wants to use the internet connection shared by you, he should connect to this network providing the same security key. After successful connection, he will able to access the internet from his machine.
Tidak ada komentar:
Posting Komentar